
Last year our old christmas lights finally kicked the bucket. I vowed never to purchase another set of the classic 220v lights with a bimetalic flasher. I was going to do this Properly™.
Since my Home Assistant is now fully Cheerlight Sync’d, I thought I’d make something that would be capable of working along with it, as well as something with the same lighting features you’d expect on modern Christmas decorations.
Features required:
- Blinking
- Twinkling
- Colour cycling (because RGB)
- Colour chase
- Sync to cheerlights
All of this can be achieved with WLED and Home Assistant (with a side of Node-RED).
Lets get building, eventually
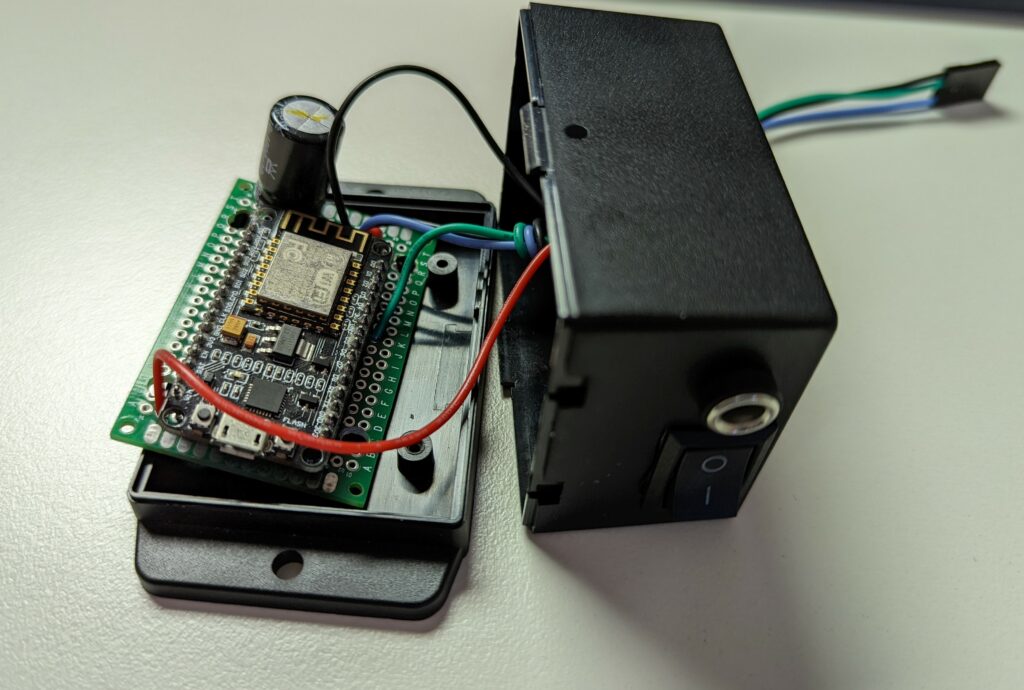
I grabbed an ESP8266, in the form of a NodeMCU DEVKIT V1.0 and flashed it with WLED in anticipation. I ordered some 5V WS2812B waterproof strips from Core-Electronics
WS2811/WS2812(B) need 3 wires. +5V, GND and DATA. The spec sheet says they need 20mA per LED, and there are 3 LEDs per bulb (Red, Green and Blue) so that works out to 60mA x 300 Bulbs. I’d need a 18A Powersupply at 5V (90W) if I wanted to run them at full brightness. But I don’t, because I want my neighbours to be able to sleep at night, so I’ll only be running them at very very low brightness.
I happen to have a 60W power supply I purchased at some point, and never used. Perfect!
I did a little bit of soldering on a breadboard following a diagram I found on the WLED website. We’ll be using the 5V version, no level shifter required, no resistor required.

Added a proper barrel-jack connector for the 5V Power in, and soldered the handy little 3-pin JST male connector that was supplied with the WS2812B strips to the output. Then I popped the whole thing in an appropriately sized (aka, just a tad too tiny to squeeze all the wires into it) project box.
Getting WLED up and running
Once powered-up, the NodeMCU/ESP8266 device will create its own AP.
Search for an SSID called WLED-AP, the password is wled1234
If your phone doesn’t throw up a hotspot login notification (or if you’re not using a phone), open a web browser to 4.3.2.1, or wled.me
The web interface will allow you to control everything, and indeed you can leave it like this if you want to use a phone to control everything without all the automation bits.
If you want to join your WLED NodeMCU/ESP8266 device to your local network and allow other things to control it (like Home Asisstant), then click the cog icon, and enter your WiFi details.
Figure out the IP address of your new WLED lights using your router web interface, or use the WLED app to discover it.
All these instructions come straight out of the WLED Getting Started guide, so head on over there if you think I missed anything.
Basic Blinkenlights
Plug the light strip in, and start playing with some of the pallettes and effects!
The Home Assistant Bits (with Node-RED assistance)
This took longer than I’d like to admit to get working. The Node-RED bits were interesting, the Home Assistant bits were incredibly frustrating and difficult to troubleshoot.
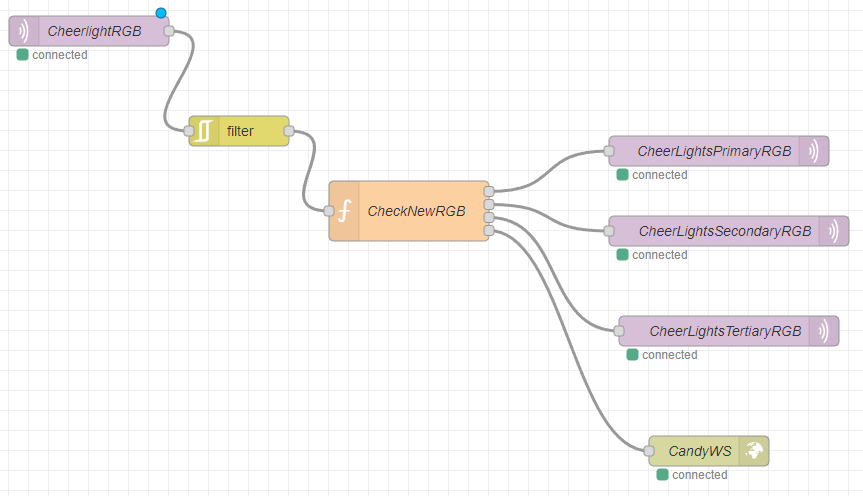
In Node-RED, this is what I ended up with. It looks for changes in the MQTT topic for cheerlightsRGB, and if it changes it updates 3 additional topics on MQTT (and a WebSocket node, but ignore that for now). The Primary, Secondary and Tertiary colours (which are the current, previous, and previous previous colours respectively).
This means I can can bring them in to Home Assistant for use in a WLED Pallette for use in the multi-colour effects.
Then a tiny modification to the Automation I created last year in this post
alias: Sync livingroom with Cheerlights
description: ''
trigger:
  - platform: mqtt
    topic: cheerlightsPrimary
condition: []
action:
  - service: light.turn_on
    data_template:
      entity_id: light.livingroom_rgb
      rgb_color:
        - '{{ trigger.payload_json["r"] | int }}'
        - '{{ trigger.payload_json["g"] | int }}'
        - '{{ trigger.payload_json["b"] | int }}'
      brightness: 100
mode: single
And that will make my living room lights start using the new post-processed RGB values, instead of the colour names.
Now that we’ve got that working, we can get the WLED Integration in Home Assistant going to make the Christmas Lights blinken.
Make the WLED effects follow the Cheerlight colours
WLED has many many effects already built in. Only some of them make use of Primary and Secondary colours, almost none use Tertiary.
We need to set the WLED PaletteID to 5, which is “Colours Only” aka, Primary, Secondaty and Tertiary.
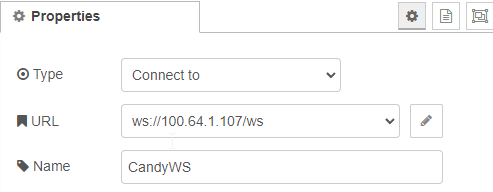
The WLED integration for Home Asisstant only allows you to set the Primary colour via the light.turn_on service. If we want to set the secondary and tertiary colours, we need to use the JSON API. There are multiple ways to send requests to the JSON API, but the one that works cleanly is using a WebSocket. You can also use HTTP POST, or MQTT (which was so terribly unreliable for me I just disabled it).
The CandyWS Node in the image above that I asked you to ignore, does this for us.
We feed the WebSocket a piece of JSON that sets the 3 colours{seg:[{'id':0,'pal':5,'col':[Primary Colour,Secondary Colour,Tertiary Colour]}]}
And thats all the Node-RED does. It just sets the colour and selects the “Colours Only” PalletteID. The selection of effects, controlling whether the Lights are on or off, all happens in Home Assistant.
Home Assistant Control and Automation
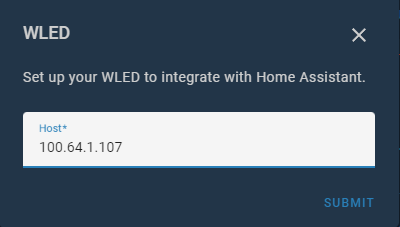
I added WLED to my Home Assistant instance. If it doesn’t get automatically detected and show up in your Notifications, go to Configuration > Devices & Services, and click the Add Integration button in the bottom right of the screen.
Once that’s done, Select the Area your lights are going to live in.
I created 2 Scenes. One for the Lights being on, and one for the lights being off. Select the WLED Device and select the settings you want.
Then Create the automations.
alias: Turn off Christmas Display after 9pm
description: ''
trigger:
  - platform: time
    at: '21:00:00'
condition: []
action:
  - scene: scene.outside_christmas_lights_off
mode: single
alias: Dim Christmas Display after 8pm
description: ''
trigger:
- platform: time
at: '20:00:00'
condition: []
action:
- scene: scene.dim_christmas_display
mode: singlealias: Turn on Christmas Display after 6pm
description: ''
trigger:
- platform: time
at: '18:00:00'
condition: []
action:
- scene: scene.turn_christmas_display_on_bright
mode: singleI turn the lights on at 6pm (as bright as they’ll go, because its still daylight).
Then I dim them at 8pm so I don’t get complaints from the anyone with a window facing my house
Then I turn them off at 9pm.
What does my display look like?
Ah, thats a subject for another post. But here’s a hint.